- 👥 Players
- 2
- 🎂 Ages
- 8+
- ⏱ Playing time
- 10–30 min
- ⭐ Difficulty
- Medium
- 🎲 You need
- A backgammon board, 15 checkers per player, 2 pairs of dice (or one pair), 2 dice cups, optional doubling cube
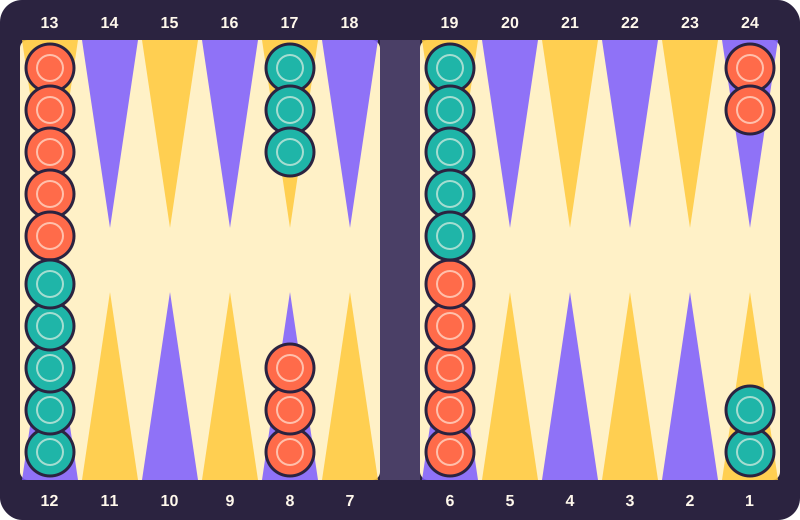
- Each player has 15 checkers. Set them up 2-5-3-5 on your 24, 13, 8 and 6 points.
- Roll two dice and move checkers forward by each number. Doubles are played four times.
- You can land on any point that isn't held by two or more enemy checkers. Landing on a single enemy checker hits it and sends it to the bar.
- A hit checker must re-enter in your opponent's home board before you move anything else.
- Bring all 15 checkers into your home board, then bear them off. The first player to remove all 15 wins.
Backgammon is one of the oldest board games still played today. Its family, known as "tables" games, goes back thousands of years, and the modern rules with the doubling cube were settled in the 1920s. The good news: you can learn the whole game in about fifteen minutes. The rest of your life is for getting good at it.
This guide covers the standard rules used in clubs and tournaments, then explains popular variations (including Turkish tavla and Greek tavli) separately so you always know which rule is which.
The goal of backgammon
Each player has 15 checkers. You race them all the way around the board, into your home board, and then off the board. The first player to bear off all 15 checkers wins.
It sounds like a pure race, but it isn't. Your checkers move in the opposite direction to your opponent's, so they keep meeting. You can hit a lone enemy checker and send it back to the start, and you can block your opponent by building walls of points they can't land on. Luck decides each roll, but skill decides what you do with it.
The board and its parts
The board has 24 narrow triangles called points, split into four quarters of six points each:
- Your home board (also called your inner board): points 1 to 6. This is where you bring your checkers before bearing them off.
- Your outer board: points 7 to 12.
- Your opponent's outer board: points 13 to 18 from your point of view.
- Your opponent's home board: points 19 to 24 from your point of view.
The raised strip down the middle is the bar. It separates the home boards from the outer boards, and it is where hit checkers wait.
Points are numbered from each player's own side, so your 1-point is your opponent's 24-point. Two useful names: your 13-point is called the midpoint, and your 7-point is called the bar point.
How to set up the board
Sit opposite each other with your home board on your right (or on your left; what matters is that the two home boards face each other). Then place your 15 checkers like this:
| Point (your numbering) | Checkers | Name |
|---|---|---|
| 24-point | 2 | Your "back checkers", deep in your opponent's home board |
| 13-point | 5 | The midpoint, in your opponent's outer board |
| 8-point | 3 | In your outer board |
| 6-point | 5 | In your home board |
Your opponent does the mirror image. A quick check: from each side, the setup reads 2-5-3-5, and the two players' 6-points face each other across the board.
You move your checkers from your 24-point towards your 1-point, so they travel in a horseshoe shape: through your opponent's home board, along the far side, down your side and into your home board.
Starting the game
Each player rolls a single die. The higher number goes first, and that first move uses both of the numbers just rolled: the starting player's die and the opponent's die. If both dice show the same number, both players roll again.
After the opening move, players take turns rolling both of their own dice. Roll the dice from a cup into the board on your right. If a die lands outside that half of the board, on top of a checker, or tilted (not flat), you roll both dice again.
How checkers move
Each die is a separate move. If you roll a 5 and a 2, you can:
- move one checker 5 points and a different checker 2 points, or
- move a single checker 5 points and then 2 more (or 2 and then 5).
When you move one checker with both numbers, the point where it stops in between must also be open. You don't get to "jump" over a blocked landing spot.
Doubles count twice. If you roll 4-4, you play four moves of 4. You can split them between checkers any way you like.
A checker always moves forward, towards your home board. It can never move backwards.
Open and blocked points
You may land on a point if it is:
- empty,
- occupied by your own checkers (any number), or
- occupied by exactly one enemy checker (this is a hit; see below).
A point with two or more enemy checkers is blocked. You can't land there, but you can pass over it. Two of your own checkers on a point is called making a point; it is safe and blocks your opponent.
You must use your whole roll if you can
This is the rule beginners break most often:
- If you can legally play both numbers, you must play both.
- If you can play only one number, you must play it.
- If you could play either number but not both, you must play the larger one.
- If neither number can be played, you lose your turn.
You're not allowed to skip a move because it would be bad for you. Sometimes the rules force you into an ugly play, and that's part of the game.
Hitting and the bar
A single checker on a point is called a blot. If your opponent lands on your blot, your checker is hit and placed on the bar.
While you have a checker on the bar, you can't move any other checker until it re-enters. To re-enter, you need a roll that matches an open point in your opponent's home board:
- a 1 enters on your 24-point, a 2 on your 23-point, and so on up to a 6 on your 19-point;
- you can enter only on a point that is open (not held by two or more enemy checkers);
- if you have two checkers on the bar, both must enter before you move anything else.
If none of your numbers lets you enter, you lose your whole turn. When your opponent has closed all six points of their home board, you can't enter at all and simply wait. This is called being closed out.
Once your checker re-enters, it starts its long journey home again from your opponent's home board. That is why hitting is so powerful: a checker hit near the end of its journey can lose 20 or more pips of progress.
Bearing off
When all 15 of your checkers are in your home board (points 1 to 6), you may start removing them. This is called bearing off.
- A roll of 6 removes a checker from your 6-point, a 5 from your 5-point, and so on.
- You may also use a number to move a checker inside your home board instead of removing one.
- If you roll a number and there is no checker on that point, you must move a checker from a higher point if you have one.
- If there are no checkers on higher points, you remove a checker from your highest occupied point. For example, with checkers only on your 3, 2 and 1-points, a roll of 6 bears off a checker from the 3-point.
If one of your checkers is hit while you're bearing off, it goes to the bar. You can't bear off again until it has re-entered and come all the way back to your home board.
Winning and scoring
The first player to bear off all 15 checkers wins the game. How much they win depends on how far behind the loser is:
| Result | When | Points |
|---|---|---|
| Single game | The loser has borne off at least one checker | 1 × cube value |
| Gammon | The loser has not borne off any checker | 2 × cube value |
| Backgammon | The loser has not borne off any checker and still has a checker on the bar or in the winner's home board | 3 × cube value |
Most people play a match: a series of games to an agreed number of points, usually an odd number like 5, 7 or 11.
The doubling cube
The doubling cube is the reason serious players say backgammon is a game of skill. It's a large die marked 2, 4, 8, 16, 32 and 64. At the start of the game it sits in the middle on 64, which means the game is worth 1.
- At the start of your turn, before you roll, you may offer to double the stakes.
- Your opponent can refuse: they give up the game immediately and lose its current value.
- Or they can accept: the game is now worth twice as much, and they take the cube. Only the player who owns the cube may offer the next double (a redouble).
Doubling is about timing. A good rule of thumb for beginners: double when you are clearly ahead but your opponent could still reasonably take; take a double when you think you'll win at least about one game in four from that position.
Crawford rule (match play)
In match play, as soon as one player is exactly one point away from winning the match, the next game is played without the doubling cube. This is the "Crawford game". It stops the trailing player from doubling immediately with nothing to lose. After the Crawford game, the cube is back in play.
Optional money-play rules
These are common when backgammon is played for points rather than as a match. Agree on them before you start:
- Jacoby rule: gammons and backgammons count as a single game unless the cube has been turned. It speeds up play.
- Beavers: when you are doubled, you may immediately redouble while keeping the cube.
- Automatic doubles: if the opening roll is a tie, the stakes double and the cube stays in the middle. Players usually limit this to once per game.
Popular variations
Turkish tavla
In Turkey backgammon is called tavla. The basic moves, hitting and bearing off are the same as above. Friendly games are usually played without a doubling cube and to a set number of points (often 5). A gammon is called mars and counts double. Many players announce rolls with traditional Persian-Turkish number names, such as "şeş beş" for 6-5.
Greek tavli
In Greece, "tavli" is a set of three games played one after another: Portes (almost identical to standard backgammon), Plakoto (you pin an enemy blot by landing on it instead of hitting it) and Fevga (no hitting at all, and both players move in the same direction).
Nackgammon
A modern variant that makes the game longer and more strategic. Each player starts with 2 extra back checkers: 2 on the 24-point, 2 on the 23-point, 4 on the midpoint, 3 on the 8-point and 4 on the 6-point.
Acey-deucey
A popular American variant in which all checkers start off the board and enter from the opponent's home board. The roll of 1-2 is special: you play the 1 and the 2, then choose any doubles you like and roll again.
Beginner strategy tips
- Build points in your home board. Every point you make there is a point your opponent can't enter on after being hit. Your 5-point is the most valuable one to make early.
- Make "the prime" your long-term plan. Six consecutive points in a row is a full prime: an enemy checker behind it can't get past.
- Count before you leave a blot. A checker 6 or fewer points away from an enemy checker can be hit by a single number; more than 6 points away, only by a combination. Leave blots where they are hardest to hit.
- Don't break your midpoint too early. Your checkers on the 13-point are a safe landing spot for checkers coming home.
- Learn the opening moves. For example, a 3-1 is almost always played 8/5, 6/5 to make your 5-point, and a 6-1 is played 13/7, 8/7 to make your bar point.
- Count the race. Add up how far each of your checkers has to go (your pip count). At the start, each player's pip count is 167. If you're well ahead in the race, avoid contact; if you're behind, keep checkers back to wait for a shot.
Common mistakes
- Moving checkers while one of your checkers is still on the bar.
- Playing only one die when both could be played, or playing the smaller number when only one can be played.
- Starting to bear off before all 15 checkers are home.
- Forgetting that a checker moved with both dice has to stop on an open point in between.
- Offering a double after rolling. Doubles must be offered before you roll.
Backgammon terms in one place
| Term | Meaning |
|---|---|
| Point | One of the 24 triangles |
| Blot | A single checker on a point, which can be hit |
| Making a point | Having two or more of your checkers on a point |
| Bar | The strip in the middle where hit checkers wait |
| Entering | Bringing a checker from the bar back into play |
| Prime | Several consecutive made points that block your opponent |
| Bearing off | Removing checkers from the board at the end |
| Pip count | The total number of points your checkers must still travel |
| Gammon | A win in which the loser has borne off nothing (2×) |
| Backgammon | A gammon where the loser still has a checker on the bar or in the winner's home board (3×) |
Frequently asked questions
Who goes first in backgammon?
Each player rolls one die. The player with the higher number goes first and plays the two numbers just rolled (their own die and the opponent's). If both dice show the same number, both players roll again.
Do you have to use both dice in backgammon?
Yes, if it is legally possible. If you can play only one of the two numbers, you must play that one; if you can play either but not both, you must play the larger number. If neither can be played, you lose your turn.
Can you move one checker with both dice?
Yes. You can move one checker by both numbers, as long as the point where it stops after the first number is open (not held by two or more enemy checkers).
What happens when you roll doubles?
You play the number four times instead of twice. A roll of 3-3 lets you make four moves of three pips each, with one checker or several.
Can you bear off if a checker is on the bar?
No. You can only bear off when all 15 of your checkers are in your home board. If one of your checkers is hit during the bear-off, it has to re-enter and travel back home before you can bear off again.
What is a gammon in backgammon?
A gammon is a win in which the loser has not borne off a single checker. It counts double the normal value. If the loser also still has a checker on the bar or in the winner's home board, it is a backgammon and counts triple.
How many points is a game of backgammon?
A normal win is worth 1 point, a gammon 2 and a backgammon 3, multiplied by the value on the doubling cube. Matches are usually played to an agreed odd number of points such as 5, 7 or 11.
How long does a game of backgammon take?
A single game usually takes 10 to 30 minutes. A match to 5 or 7 points can take about an hour.
Sources
We check every rule against these references. Where sources disagree, we say so in the text.